This website stores cookies on your computer. These cookies are used to collect information about how you interact with our website and allow us to remember you. We use this information in order to improve and customize your browsing experience and for analytics and metrics about our visitors both on this website and other media. To find out more about the cookies we use, see our Privacy Policy.
If you decline, your information won’t be tracked when you visit this website. A single cookie will be used in your browser to remember your preference not to be tracked.
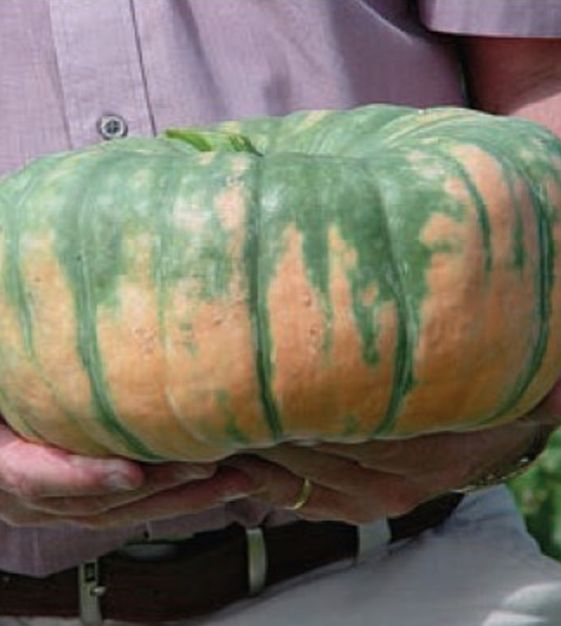
100 days. This unusual Pumpkin is pale peachy orange with splashes of bluish gray-green. Its colors are almost ghostly! The ribbed and flattened fruits average 3 to 6 pounds, with dense, sweet and dry flesh that's great for mashing, soups and roasting. It's a challenge to carve these thick-walled beauties, but they're more than beautiful enough to display intact in your fall vignettes before they're brought to the kitchen. (F1.)
Pumpkin Sowing Instructions
Planting Depth:1” Row Spacing:5’ Hill Spacing:5’-6’ Days to Germination: 5-10 days Germination Temperature: 65°-75°F
Pumpkins need space to ramble, as well as a hot
growing site in full sunlight. They may be started
outdoors shortly after the last frost. Direct-sow 3 to
5 seeds per hill, then thin to the 2 strongest seedlings.
To start seedlings indoors, sow singly in pots 3 to 4
weeks before transplant date. Provide seedlings with
good ventilation, strong light and even moisture.
Transplant outdoors after the last frost date. Enrich
soil with organic fertilizer, compost and/or well rotted
manure. Cover seedlings with cloches if it
gets cool, water regularly and feed as needed with
kelp or fish emulsion. (Powdery mildew on leaves
won’t affect the pumpkins.)
Harvest when mature with a sharp knife, leaving
2" of stem at the top. To cure Pumpkins, if there is
no danger of frost, leave outdoors in the sun for 10
days or place in a warm, dry room for 5 to 7 days.
Store in a cool, dry place until use.
Cooking Tip:
The Frost Is on the Pumpkin
We’d be happy just to grow Rouge d'Étampes Pumpkins for their beauty alone, but they also make heavenly, velvety soups. Since they often grow quite large, we cut them up into large chunks, blanch briefly in boiling water, then wrap the chunks individually in foil and put them in the freezer for a winter-long supply.
If you step away from your wheelbarrow for more than an hour, its contents will be emptied and returned to inventory. If you haven't made up your mind, place your order knowing that you can change it prior to shipment. If you're just not ready to order yet, please print a copy of your wheelbarrow for your own reference.