This website stores cookies on your computer. These cookies are used to collect information about how you interact with our website and allow us to remember you. We use this information in order to improve and customize your browsing experience and for analytics and metrics about our visitors both on this website and other media. To find out more about the cookies we use, see our Privacy Policy.
If you decline, your information won’t be tracked when you visit this website. A single cookie will be used in your browser to remember your preference not to be tracked.
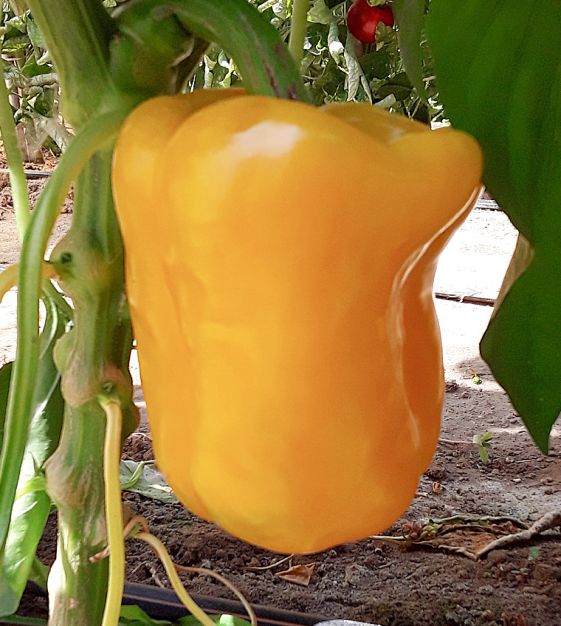
70 days. This early-maturing Italian hybrid produces big, elongated, blocky and thick-walled fruits that turn from green to sweet and flavorful golden yellow. The plants themselves are quite tall and resistant to Tobacco Mosaic Virus. (F1.)
Pepper Sowing Instructions
Planting Depth:1/4” Row Spacing:18”-24” Plant Spacing:18” Days to Germination: 8-18 days Germination Temperature:70°-85°F
Start Peppers 6 to 8 weeks before the last spring
frost date in your area. Sow 3 to 5 seeds per
individual pot of starter mix or singly in peat pots.
Provide light, even moisture and ventilation.
Bottom warmth hastens germination. Seedlings
prefer 70° to 85°F during the day with slightly cooler
temperatures at night. Individually transplant the
strongest seedlings to 4" pots and fertilize weekly.
Do not allow seedlings to become root-bound.
Amend a well-draining, sunny site with organic
fertilizer, compost and/or well-rotted manure.
When night temperatures are reliably above 55°F,
expose the Pepper plants to sun gradually over 1 week,
then transplant. Water well and fertilize as needed
with manure tea, kelp or fish emulsion. Mulch soil
around Peppers if soil dries out too quickly. Harvest
carefully, using a sharp blade, leaving 1⁄2" of stem,
when Peppers reach desired size and color.
Turn Up the Heat
From start to finish, Peppers are a crop that like it hot. Unless your climate is truly steamy, you must start them ahead in a warm spot, on a heat mat if possible, or on top of the refrigerator or kitchen cabinet. Only after warm weather has settled in should you set them out--in the sunniest part of the garden.
Delayed Gratification
For a greater overall Pepper yield, remove any blossoms that appear on your young transplants up until the time you set them in the ground. You'll miss out on the earliest fruits, but by letting the plant put its energy into its growth rather than early fruits, you'll get more productive plants later on.
The Look for Late Summer
Most of us grow Peppers because they taste so great, but I find them equally useful as an ornamental. If I want to add some edibles to a dooryard plot, I might not pick a sprawling cuke or Tomato vine, but I’d pick a few Pepper plants, with their healthy green foliage, tidy upright habit and colorful fruits. There they are, quietly green but growing steadily, until all of a sudden the plants are as showy as rosebushes. Though red ones are always my favorites, the yellow ones are gorgeous too. And they appear at a time in the season when many flowering plants have passed their prime--especially herbs whose flowering time is usually spring and early summer. Try some in pots on the terrace, too.
If you step away from your wheelbarrow for more than an hour, its contents will be emptied and returned to inventory. If you haven't made up your mind, place your order knowing that you can change it prior to shipment. If you're just not ready to order yet, please print a copy of your wheelbarrow for your own reference.